
Microsoft Project is an industry-leading project management software used by professionals across various industries to plan, execute, and control projects effectively. With its robust features and capabilities, Microsoft Project helps teams maximize productivity and achieve project goals. In 2024, the tool continues to evolve, offering new functionalities and enhancements that can significantly improve how projects are managed. This comprehensive guide will provide tips and tricks to help you get the most out of Microsoft Project and boost your productivity.
Overview of Microsoft Project
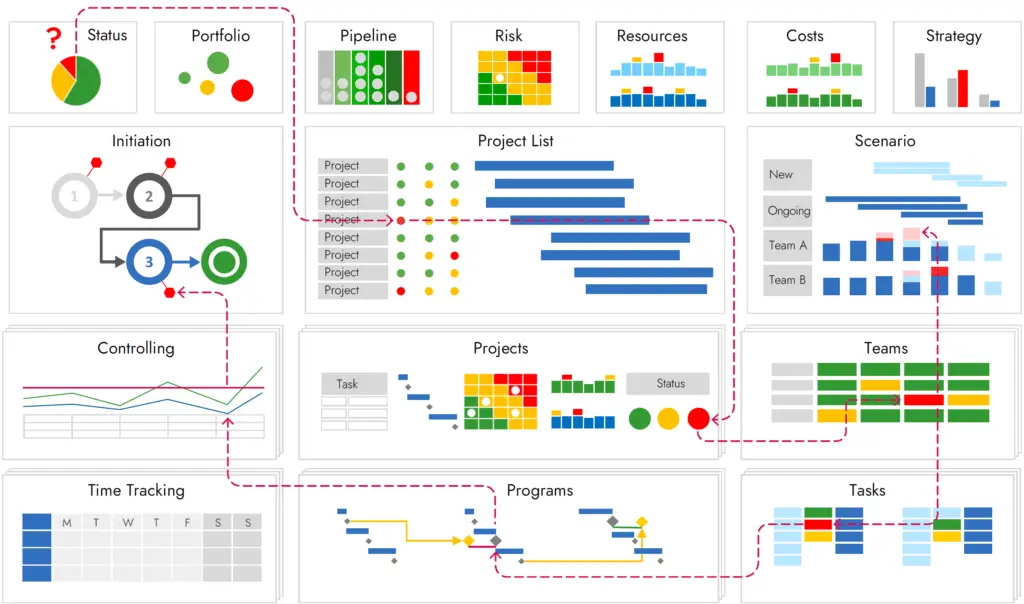
Microsoft Project is a versatile project management software designed to assist project managers and teams in planning, executing, and tracking projects. It offers a range of tools for task scheduling, resource allocation, budget management, and progress tracking, making it an essential tool for managing complex projects.
Key Features of Microsoft Project
- Task Management: Create and assign tasks, set deadlines, and track progress.
- Resource Management: Allocate resources effectively and manage workloads.
- Gantt Charts: Visualize project timelines and dependencies.
- Project Reporting: Generate detailed reports to track project performance.
- Collaboration Tools: Facilitate communication and collaboration among team members.
- Integration: Integrate with other Microsoft tools like Excel, Outlook, and Teams.
Getting Started with Microsoft Project
Before diving into advanced tips and tricks, it’s essential to understand the basics of Microsoft Project. Here’s a brief overview of getting started with the software.
Setting Up Your Project
- Create a New Project: Open Microsoft Project and select “New Project” from the File menu. You can choose a blank project or use a template.
- Define Project Information: Enter essential details such as project start date, end date, and calendar options. This helps set the foundation for your project plan.
- Create Tasks: Break down your project into manageable tasks. Enter task names, durations, and start and end dates.
- Set Dependencies: Establish relationships between tasks to reflect the project flow. Use predecessors and successors to link tasks.
- Assign Resources: Allocate resources (e.g., team members, equipment) to tasks. Define resource availability and work schedules.
Customizing the Project Workspace
Microsoft Project offers various customization options to tailor the workspace to your needs:
- Views and Tables: Choose from different views (e.g., Gantt Chart, Task Usage) to visualize project data. Customize tables to display relevant information.
- Filters and Groups: Use filters to focus on specific tasks or resources. Group tasks based on criteria such as phase or priority.
- Formatting: Customize the appearance of Gantt charts and other views to improve readability and presentation.
Tips and Tricks for Maximizing Productivity
With a solid understanding of the basics, you can now explore advanced tips and tricks to enhance your productivity with Microsoft Project in 2024.
1. Utilize Templates for Quick Setup
Microsoft Project offers a variety of templates tailored to different industries and project types. Templates provide a pre-built structure, saving time in setting up new projects. Customize the template to fit your specific requirements and start planning immediately.
How to Use Templates:
- Go to File > New.
- Browse through the available templates.
- Select a template that matches your project type.
- Customize the template to align with your project details.
2. Master Keyboard Shortcuts
Keyboard shortcuts can significantly speed up your workflow by reducing the time spent navigating through menus. Here are some useful shortcuts:
- Ctrl + N: Create a new project.
- Ctrl + C: Copy selected items.
- Ctrl + V: Paste copied items.
- Ctrl + G: Go to a specific task ID.
- Alt + Shift + Right Arrow: Indent task.
- Alt + Shift + Left Arrow: Outdent task.
3. Leverage the Task Inspector
The Task Inspector provides insights into potential issues with your project plan, such as scheduling conflicts or resource overallocation. It offers suggestions to resolve these issues, helping you maintain a smooth project flow.
How to Access Task Inspector:
- Select a task.
- Click on the Task tab.
- In the Tasks group, click Inspect Task.
4. Use Resource Leveling
Resource leveling helps balance workloads by redistributing tasks among available resources. It ensures that no resource is overburdened, which can lead to delays and decreased productivity.
How to Use Resource Leveling:
- Go to the Resource tab.
- In the Level group, click Level Resource.
- Select the resources to level and choose leveling options (e.g., by priority, within slack).
5. Integrate with Microsoft Teams
Microsoft Teams integration allows seamless collaboration and communication among project team members. Share project updates, documents, and tasks directly within Teams to keep everyone aligned and informed.
How to Integrate with Teams:
- Go to File > Info.
- Click Link to Team.
- Follow the prompts to connect your project to a Teams channel.
6. Automate Routine Tasks with Macros
Macros automate repetitive tasks, saving time and reducing errors. Record a series of actions and replay them with a single click to streamline your workflow.
How to Create a Macro:
- Go to the View tab.
- In the Macros group, click Record Macro.
- Perform the actions you want to automate.
- Click Stop Recording.
7. Use Custom Fields for Enhanced Tracking
Custom fields allow you to track additional information specific to your project. Create custom fields for metrics like risk levels, project phases, or task priorities to gain deeper insights.
How to Create Custom Fields:
- Go to the Project tab.
- In the Properties group, click Custom Fields.
- Choose the type of field (e.g., text, number) and enter the field name.
- Use the custom field in your project plan.
8. Schedule Regular Progress Updates
Regular progress updates keep your project on track and allow you to address issues promptly. Schedule weekly or bi-weekly status meetings to review progress, discuss challenges, and adjust plans as needed.
How to Track Progress:
- Go to the Task tab.
- In the Schedule group, click Update Tasks.
- Enter the actual start and finish dates, and percentage complete for tasks.
9. Create Detailed Reports
Microsoft Project offers various built-in reports to provide insights into project performance. Customize these reports to highlight key metrics and share them with stakeholders for informed decision-making.
How to Create Reports:
- Go to the Report tab.
- Choose from categories like Dashboard, Resources, or Costs.
- Customize the selected report to include relevant data.
- Save and share the report with stakeholders.
10. Use Project Timeline for Visual Overview
The Project Timeline view offers a high-level visual overview of your project, highlighting key milestones and tasks. This view is useful for presentations and quick status updates.
How to Use Project Timeline:
- Go to the View tab.
- In the Split View group, check Timeline.
- Drag and drop tasks or milestones onto the timeline.
Advanced Techniques for 2024
As Microsoft Project continues to evolve, new features and techniques emerge to enhance productivity. Here are some advanced techniques to explore in 2024.
1. Explore AI-Powered Insights
Microsoft is integrating more AI-powered features into Project to provide predictive insights and automation. Leverage AI to identify potential risks, suggest task assignments, and optimize resource allocation.
2. Use Agile Methodologies
Microsoft Project now supports agile methodologies, including Scrum and Kanban. Use agile boards to manage tasks, track sprints, and visualize workflow.
How to Use Agile Boards:
- Go to File > New.
- Select an agile project template (e.g., Scrum or Kanban).
- Customize the board with tasks, backlogs, and sprints.
3. Integrate with Power BI for Advanced Analytics
Integrate Microsoft Project with Power BI to create advanced dashboards and analytics. Visualize project data, track key performance indicators, and share interactive reports with stakeholders.
How to Integrate with Power BI:
- Export project data to Excel.
- Import the data into Power BI.
- Create and customize dashboards to visualize project metrics.
4. Implement Project Online
Microsoft Project Online offers cloud-based project management, enabling teams to collaborate and manage projects from anywhere. Use Project Online for enterprise-level project and portfolio management.
How to Get Started with Project Online:
- Subscribe to Project Online through the Microsoft 365 admin center.
- Set up your Project Online environment.
- Create and manage projects using the online interface.
5. Automate Workflows with Power Automate
Integrate Microsoft Project with Power Automate to create automated workflows. Automate tasks such as sending notifications, updating task statuses, and syncing data across platforms.
How to Use Power Automate:
- Sign in to Power Automate.
- Create a new flow.
- Choose triggers and actions related to Microsoft Project.
- Configure the flow and save it.
Conclusion
Maximizing productivity with Microsoft Project involves leveraging its extensive features and capabilities to streamline project management processes. By utilizing templates, mastering keyboard shortcuts, leveraging the Task Inspector, and integrating with tools like Microsoft Teams and Power BI, you can enhance your efficiency and achieve project success in 2024. Stay updated with the latest advancements, explore AI-powered insights, and adopt agile methodologies to keep your projects with discipline.
Nero Software 2025: Complete Guide to the Ultimate Multimedia Suite
Windows 11 and Microsoft Office 2024: The Ultimate Productivity Bundle Guide
Windows 11 and Microsoft Office 2024: The Ultimate Productivity Bundle Guide
In today's digital workspace, having the right operating system and productivity...
Ashampoo Software Review 2025: Complete Guide to Premium PC Optimization Tools

McAfee Antivirus 2025: Complete Security Review and Buying Guide

AOMEI Products: The Ultimate Guide to Professional Data Management and System Solutions 2025

CorelDRAW Graphics Suite 2023 for Windows and Mac: The Best Guide

AOMEI Backupper Professional: The Ultimate Backup Solution for Windows Users
The Ultimate Guide to Kaspersky Antivirus (2024): Features, Security, Pricing & More

Kaspersky: A Comprehensive Analysis & Importance as Cybersecurity Giant
